Quick Setup Target
Build from a simple baseline
Start with a known DPI step such as 400, 800, or 1600, then adjust your operating system and in-game settings around that baseline. Simple starting points make it much easier to compare changes and undo mistakes.
Consistency First
Avoid changing multiple variables at once
If you swap DPI, pointer speed, and in-game sensitivity all at the same time, it becomes hard to tell what actually improved your aim. Change one thing, test it properly, and keep notes so you can return to a setting that felt better.
-
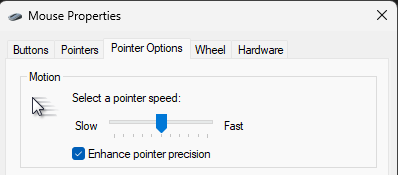
1
Set up Windows pointer settings
Open Start and go to Settings > Bluetooth & devices > Mouse to adjust the Mouse pointer speed slider. If you want the more detailed controls, search for Control Panel, open Hardware and Sound > Mouse, then use the Motion slider under Pointer Options.
For a more direct, predictable feel, turn off Enhance pointer precision in the Pointer Options tab. That disables the software acceleration layer so your hand movement maps more consistently to cursor movement.
Microsoft support: Change mouse settings in Windows
-
2
Set up tracking speed on macOS
Open the Apple menu, go to System Settings, then choose Mouse or Trackpad from the sidebar. Use the Tracking speed slider to raise or lower cursor movement until it matches your desk space and screen size.
Keep the change modest at first. If the cursor feels too slow on a high-resolution display, raise it a little and test again instead of making a huge jump.
-
3
Choose DPI and clean up your hardware setup
If you use a gaming mouse, set DPI through the manufacturer software rather than guessing from the operating system alone. Logitech, Razer, Endgame Gear, and similar brands usually let you save exact DPI steps directly on the mouse.
A lot of competitive players stay in the 400 to 800 DPI range because it keeps small movements easier to control, then they tune sensitivity inside the game. Pair that with a consistent mousepad surface so the sensor is not dealing with changing texture from one session to the next.
-
4
Test the setting and give it time
Move the cursor across the screen and check whether the motion feels smooth and proportional to your hand movement. On 1440p or 4K displays, you may need slightly higher DPI or tracking speed just to cover the desktop comfortably.
Once you find a setting that feels stable, stay with it for a few weeks before making another big change. Consistency is what builds muscle memory, and constant tweaking usually hides whether a setup is actually improving.
Recommended Starting Points
Baseline ideas by screen resolution
These are not hard rules. They are simple starting points meant to help you reach a comfortable desktop speed before you fine-tune your in-game sensitivity and DPI.
FAQ
Mouse sensitivity setup FAQ
Should I disable Enhance pointer precision?
If you want the most predictable cursor behavior, usually yes. It adds mouse acceleration in Windows, which can make the same hand movement produce different cursor travel depending on speed.
What DPI should I start with for gaming?
A safe starting point is 400 or 800 DPI. Both are common, easy to compare, and work well for most FPS and general desktop setups.
Why does my sensitivity feel different on another monitor?
Resolution, display size, and operating system scaling can all change how fast the cursor feels across the screen. That is why higher-resolution displays sometimes need slightly different DPI or pointer speed.
How long should I test a new sensitivity?
Give it at least a couple of weeks if it feels broadly comfortable. Short testing sessions can tell you whether something is obviously wrong, but longer use is what reveals whether the setting is truly consistent.